

How to integrate Facebook Login API into your React app

Today, we're going to learn how to integrate Facebook login API into your React app. Why do we need that? According to data from oberlo, Facebook is one of the social media which has more than 2.8 billion active users every day. Where this number is spread across Facebook's main business, namely Facebook, WhatsApp, Instagram, and Messenger.
One of the ways to attract new users to register is that users can easily register. By utilizing the large number of active users on Facebook and integrating Facebook login API into our website, it will increase the probability of increasing users on our website by simply doing one tap on sign up that are already integrated with existing accounts on Facebook.
This article was originally posted at: https://www.quod.ai/post/how-to-integrate-facebook-login-api-into-your-react-app
Objectives
In this tutorial, we will show you how to:
- Set up a Facebook App
- Create React.js App
- Install Package "react-facebook-login"
- Adding Facebook login to our React app
- Run React App to Facebook Login
- Run our React App to login with Facebook
1. Set up a Facebook App
In this tutorial, we will use several frameworks, tools and modules as below.
- Node.js. In this tutorial, we are using version 14.15.5. If you have not installed, you can download it from https://nodejs.org/en/download/
- react-facebook-login package from npm (node package manager)
- React.js. We use version 17.0.1. Before create React App you must install “npx“ package. If you have not installed, you can following this website https://www.npmjs.com/package/npx
- Text Editor or IDE (We recommend using Visual Studio Code)
- Terminal
After all the requirement are available, we need to register as a Facebook Developer Apps. To register, we need to log in using your existing Facebook account at https://developers.facebook.com/apps/ . If you haven't logged in to Facebook, you will be asked to enter your email or mobile number and password.

After that, you will redirect to https://developers.facebook.com and click “Get Started” if the first you register at Facebook Developer Apps.

You will be taken to the registration dashboard , and click “Continue”

Fill container of Primary Email with your email other than the Facebook account email that has been registered

You will get an email code from Facebook. Fill that container with the code you got earlier.

Choose as “Developer” and the press button “Complete and Registration”

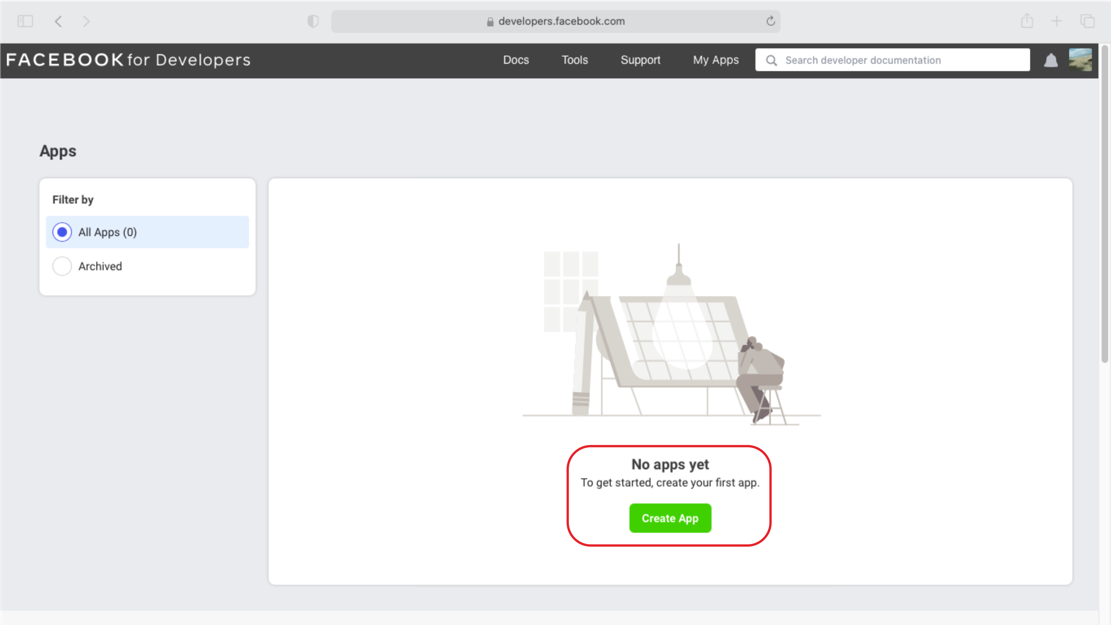
We will be redirected to Facebook for the Developer dashboard

Press button “Create App” for create app in Facebook Developer.
Choose “Build Connected Experiences” and the press button “Continue”

Fill the App Display Name with what you want to name this app and your email that was previously registered. In this tutorial we use the name “React_Login”. After that, press the button “Create App”.

After checking the captcha dialog and click submit button, we will be redirected to the Facebook Application Dashboard.

2. Create React.js App
To create a React project we use the command line or CLI. Referring to the https://reactjs.org/docs/create-a-new-react-app.html#gatsby-focus-wrapper, we can create a React project with the command
npx create-react-app react-fb_login
This command works by downloading the latest React Js template from the repository. Or we can also download the React Js template and place it globally on our computer, so that every time we create a new React project we don't need to download it from the repository. The command line is as follows.
npm install -g create-react-app
create-react-app react-fb_login
Next, go to “ react-fb_login ” folder and open the project in your IDE or Text Editor. Below is the template structure for our React application

You can also see "package.json" in our React project folder to see what packages are installed by default and the versions of the packages.
{
  "name": "default_react",
  "version": "0.1.0",
  "private": true,
  "dependencies": {
    "@testing-library/jest-dom": "^5.11.9",
    "@testing-library/react": "^11.2.5",
    "@testing-library/user-event": "^12.8.0",
    "react": "^17.0.1",
    "react-dom": "^17.0.1",
    "react-scripts": "4.0.3",
    "web-vitals": "^1.1.0"
  },
We can run our React project which is the default design template for create-react-app. To run, we only need to call this command in the terminal, where previously we have directed our terminal into our React project folder (react_fb_login).
npm start
By default the React app runs on localhost with port 3000.

3. Install the “ react-facebook-login ” library
In this tutorial we will be using the "react-facebook-login" package / modules / library which we will be installed in our React application project. To install this library we just need to use the command below in the terminal from our project directory.
npm install react-facebook-login
After the install is complete, we will see the “ react-facebook-login ” package has been added to the package.json file.
{
  "name": "default_react",
  "version": "0.1.0",
  "private": true,
  "dependencies": {
    "@testing-library/jest-dom": "^5.11.9",
    "@testing-library/react": "^11.2.5",
    "@testing-library/user-event": "^12.8.0",
    "react": "^17.0.1",
    "react-bootstrap": "^1.5.1",
    "react-dom": "^17.0.1",
    "react-facebook-login": "^4.1.1",
    "react-scripts": "4.0.3",
    "web-vitals": "^1.1.0"
  },
We need to set up our React app project to running with HTTPS. This is because currently Facebook Login need to use HTTPS. To set this up, we need to replace the script of "start" in our packagae.json file with the start script below. The packagae.json file is in the directory "react-fb_login/package.json "
"start": "HTTPS=true react-scripts start",
  "scripts": {
    "start": "HTTPS=true react-scripts start",
    "build": "react-scripts build",
    "test": "react-scripts test",
    "eject": "react-scripts eject"
  },
4. Adding Facebook login to our React app
import React, { useState } from 'react';
import FacebookLogin from 'react-facebook-login';
import { Card, Image } from 'react-bootstrap';
import './App.css';


function App() {


  const [login, setLogin] = useState(false);
  const [data, setData] = useState({});
  const [picture, setPicture] = useState('');


  const responseFacebook = (response) => {
    console.log(response);
    setData(response);
    setPicture(response.picture.data.url);
    if (response.accessToken) {
      setLogin(true);
    } else {
      setLogin(false);
    }
  }


  return (


          {!login &&

          }
          {login &&

          }

        {login &&

            {data.name}

              {data.email}


        }


  );
}


export default App;
View App.js in context at Quod AI
Line 1-4: We are calling all the libraries needed to build our React app project, including calling the react-facebook-login, react-bootstrap and react libraries.
Line 26-39: We use the FacebookLogin component from the react-facebook-login library to login to Facebook. This library makes it easy for us to configure our React app to log into Facebook. In this component we need to add the appId (appId="") that we got from the dashboard at Facebook Developer.

Line 36-38: The FacebookLogin component is a button-like component. The FacebookLogin button will turn into an image component when we have successfully logged in.
Line 41-47: Our Facebook profile information will appear in the form of name and email if we have successfully logged in.
Line 12-21: This is an arrow function used to capture the response from the FacebookLogin component. In this response we will get an access token and also some profile data from our Facebook.
5. How the FacebookLogin library works
To understand how the FacebookLogin library works, we need to take a look at the code we have installed in our project. Open the react-facebook-login folder in the directory "/ node_modules / react-facebook-login /". Then open the facebook.js file in the directory "/node_modules/react-facebook-login/dist/facebook.js". Before the FacebookLogin component is rendered, the attributes given to this component will be fetched and processed by FB SDK, especially in the appId we prepared earlier.
window.FB.init({
  version: 'v' + version,
  appId: appId,
  xfbml: xfbml,
  cookie: cookie
});
View facebook.js in context at Quod AI
      if (_this.props.isMobile && !disableMobileRedirect) {
        window.location.href = '//www.facebook.com/dialog/oauth?' + (0, _objectToParams2.default)(params);
      } else {
        window.FB.login(_this.checkLoginState, { scope: scope, auth_type: params.auth_type });
      }
View App.js in context at Quod AI
Line 126: The login function is executed when we click the login button. Then the response will be caught by the checkLoginState function.
    }, _this.responseApi = function (authResponse) {
      window.FB.api('/me', { locale: _this.props.language, fields: _this.props.fields }, function (me) {
        _extends(me, authResponse);
        _this.props.callback(me);
      });
    }, _this.checkLoginState = function (response) {
      _this.setStateIfMounted({ isProcessing: false });
      if (response.authResponse) {
        _this.responseApi(response.authResponse);
      } else {
        if (_this.props.callback) {
          _this.props.callback({ status: response.status });
        }
      }
View App.js in context at Quod AI
Line 74: The authResponse we get will then be processed by the responseApi function.
Line 69-73 the responseApi data will be returned to the callback function which in our code was previously used to get the profile data response from our Facebook account.
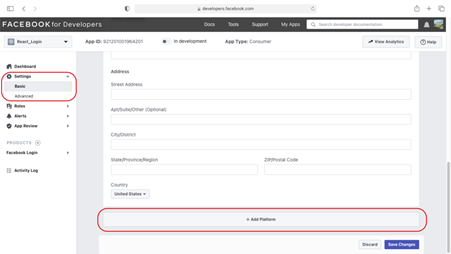
Next step, Open our Facebook Developer dashboard, click on "Settings" in the left navigation, then select "Basic". Continue scrolling down until you find the "+ Add Platform" button.
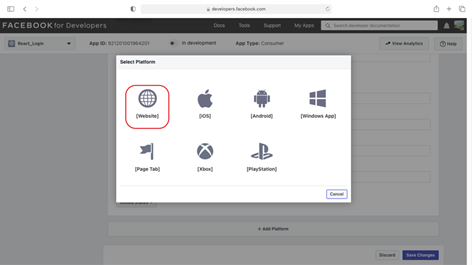
Then will be pop up select platform menu. Choose “Website”
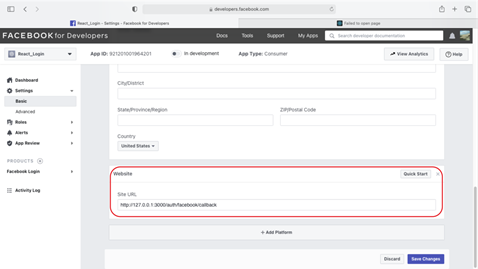
fill in the " Site URL " container with " http://127.0.0.1:3000/auth/facebook/callback " and then press the "Save Changes" button.
6. Run our React App to login with Facebook
To run this react app, we use command line like below.
npm start
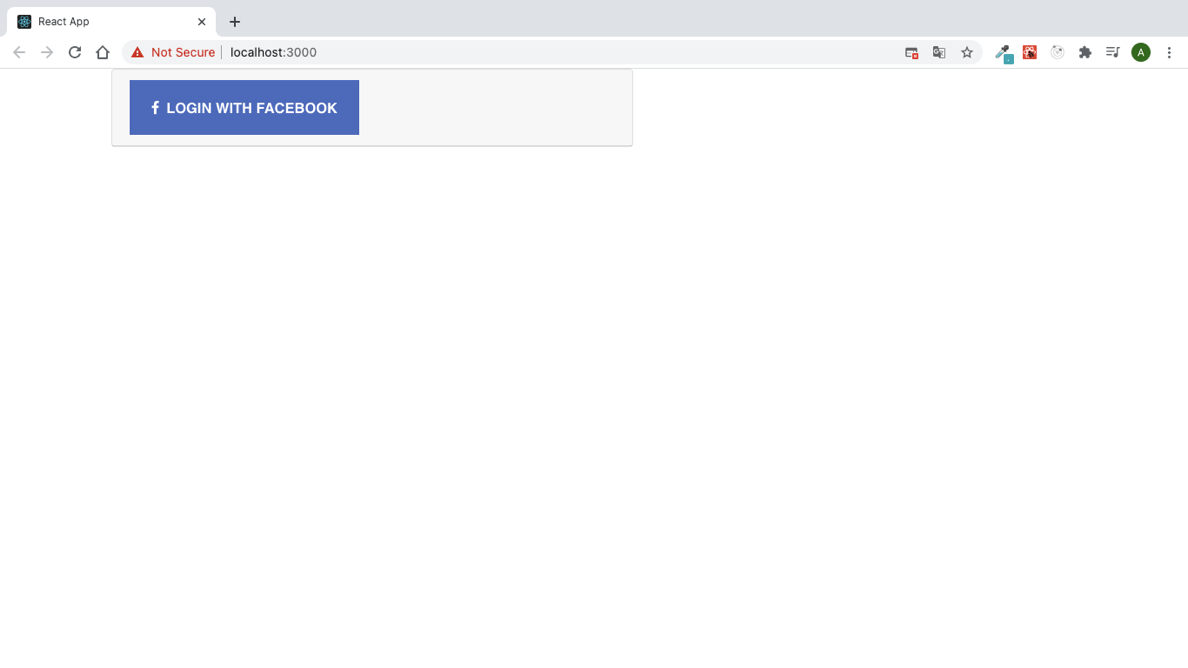
Go to https://localhost:3000 and you can see the browser displays a button to Login With Facebook as below.
Click the `Login with Facebook` button then it will be a Facebook login dialog pop up.

Enter your email address or phone number and password. Then press button “Log in”. It will be a Facebook login dialog pop up again. Press button “Continue as "your_name"” and it will be back to the previous page with this data.

Congratulations, you have successfully integrated reactions with Facebook using the Facebook Login API. In our browser, it displays the profile picture and name of our Facebook account.

You can see the full code on our GitHub repository: https://github.com/QuodAI/tutorial-react-facebook-api-login
Quod AI is code search and navigation on steroids. We turn code into documentation that developers actually use. Do follow us on Twitter @quod_ai for updates on our product and DEVs community content.
Check our app at: beta.quod.ai


